How to Build a Bamboo Farm Hut
Last May, my family visited our bangus (milkfish) farm. My two grandkids came along. We had lunch at the farm hut (“alulong” in Pangasinense) sitting on a small tract of land in the middle of the ponds.
It was May, the last dry season month. Across the ponds, light breeze blew through nearby trees, giving the “alulong” natural ventilation and cooling effect. The hut has no walls - only the roof, posts and raised floor with backrest. Well, we can say it was al fresco dining, almost.
The farm hut, with its raised floor, has bare fixtures. A fixed bamboo bench, two long movable wooden benches and a wooden table - all recently built from recycled materials.
These proved quite handy for the “outdoor” lunch we served at the hut - grilled marinated pork, bangus "sinigang" (popular local dish using tamarind broth stewed with tomatoes, garlic, onions, and veggies), fried “malaga” fish (also called rabbit fish or spinefoot fish), white prawns. And newly picked carabao mangoes for dessert.
After lunch, my grandkids took a nap on portable cushions on the hut's raised wooden floor. Later in the day, my guests checked in for overnight stay in Lingayen. They left for Manila the next day, but vowed to return as all of them enjoyed the scenery and food.
It occurred to me that we needed to make some improvements in the “alulong” to make it more guest-friendly. So why not expand, build a small extension hut to provide bigger space. Also add more fixtures such as benches and a small kitchen counter.
The extension was by itself a separate hut from a construction viewpoint. So, in this blog post, I’d like to share our recent experience in building the bamboo hut - using native materials and know-how.
Materials Needed
- 4 pcs. bamboo posts (“singeg”) at P50 each.
- 10 pcs. long, thin bamboo (“calasan”) at P50 each.
- 6 pcs. G.I. corrugated roofing sheet (6 ft. each)
- 2 kilos G.I. wire No. 16
- old rubber slippers or bicycle tires
- construction nails, 4”, 3”, and 2”
a. “Buek” - for use as bamboo slats
b. “Singeg” - for use as main posts
c. “Calasan” - for use as roof frames; also as frame for benches and backrests. The lower part of “calasan” is also called “singeg” and can be used as low posts, beams, etc.
 |
| "Calasan" bamboo (left); "singeg" bamboo (right) |
 |
| "Buek" bamboo |
1. Planning
Plan the size and design of the farm hut (“alulong”). The hut extension I had in mind measures 76 in. wide, 95 in. long, and 82 in. high from the ground level. Roof is gable type. Except for the roof (G.I. sheets), the hut is all made of bamboo. Note: Firm up the detailed design and dimensions first before buying the type and quantity of materials.
2. Making Posts
a. For posts, make sure to use the correct type of bamboo, i.e., thick and strong ones (“bayog” in Tagalog, “singeg” in Pangasinense).
b. Shave off all rough parts in the nodes and internodes of the bamboo posts, using a bolo knife.
c. Saw off the top part of the pole about 2 in. from the topmost node.
d. From the topmost node, make a 2 in. long “fish mouth” cut using bolo knife and chisel (chop off at two opposite sides starting from the topmost node) to provide an open slot for the bamboo beam.
 |
| Main posts with "fish mouth" cut at the end |
f. Set aside the four finished posts.
3. Making a Gable Roof Frame
a. Measure and cut the desired parts from the “calasan” bamboo and assemble the roof frame on the ground to make the job easier.
b. First, prepare 4 temporary bamboo posts (about 1.5 ft. long each). Old “singeg” bamboos will do for this purpose. At the top end of the temporary posts, make a “fish mouth” cut to allow laying of beams on top. Dig 4 temporary holes on the ground, following the desired length and width of the hut. Insert the 4 posts in the holes and back fill with earth.
 |
| Four temporary posts with "fish mouth" cut. These posts will support the bamboo roof frame being assembled on the ground |
d. Measure and cut 2 longitudinal poles each 95 in. long. Position each longitudinal pole on top of and perpendicular to the beams. This serves as the joist. Place another joist at the other end. In my hut extension, the joists are located at the north and south ends.
e. Measure and cut 2 vertical poles, (27 in. net length, 31.5 in. actual length including allowance). This serves as the “rise” of the gable roof from the middle of the joist (or longitudinal beam) to the apex of the gable roof. Using bolo knife, make a fish mouth cut at the top part of each vertical pole. Attach the rise to the middle of the joist at the inside portion.
Nail the vertical pole (rise) to the joist using a 3 in. nail. Further reinforce by strapping it down to the joist using double GI wire. See to it that vertical poles are perpendicular to the joists.
f. Make another 76 in. lateral beam and lay over the top of the 2 vertical poles in (e) above. This serves as the ridge bar or pole. Attach the ridge pole to the fish mouth cut of the 2 vertical poles using a 2 in. nail. Further reinforce attachment by fastening the ridge pole to the vertical poles using double GI wire.
g. Measure and cut 3 pairs of sloping poles 70.5 in. long (each pole). These poles serve as the common rafters. Attach one piece to another piece using a 3 in. nail (2.5 in. from the top of the pole). Position the 3 pairs of rafters over the ridge pole (one at each end and one at the middle). Attach the lower end of the rafters to the beams using a 3 in. nail.
h. Measure and cut 9 pieces of lateral bamboo poles each 76 in. long. These serve as the roofing battens to be installed over the common rafters and on which the GI roofing sheets will be directly laid. Install one batten pole each at the following locations:
(1) on top of the crossed rafters over the ridge pole
(2) on top of the east beam
(3) about 5.5 in. from the ridge pole
(4) at the middle of (2) and (3) above
(5) at the bottom of the east eave (2 in. from the end)
Install at the other side of the roof frame 4 batten poles – on top of the west beam, near the ridge pole, at middle, and at the bottom of the west eave.
 |
| Bamboo roof frame being assembled on the ground - consists of 4 posts (temporary), 2 lateral beams, 2 longitudinal joists, 2 vertical rises, 1 ridge pole, 3 sets of diagonal rafters, and battens (9 poles as completed) |
(1) Attach the lowest battens (at the eave) to the rafters – on north end, south end, and at the middle.
(2) Attach the topmost batten to the ridge pole – on north end, south end, and at the middle
(3) Attach the middle battens to the rafters – on north end, south end, and at the middle
4. Raising the Assembled Roof Frame on Hut Posts
a. Dig up two holes on the ground at the planned location of the extension hut. Note: plan is to attach the extension hut right next to the existing one (that is, west side posts of the extension hut next to the east side posts of the original hut).
b. On the two holes, raise the two west side posts that were completed in Step 2f above. Make sure the two west side posts of the extension hut are properly aligned and leveled with the posts of the original hut. Note: At least four people are needed to hoist the frame atop the posts.
c. Position the completed roof frame atop the two west side posts to determine proper fit and leveling.
 |
| Assembled bamboo roof frame being hoisted up and positioned atop two bamboo posts. The main beam of the roof frame (above worker's head) sits on top of the two bamboo posts (with fish mouth end) |
e. Raise the east end of the roof frame on top of the two east side posts. Ensure the proper alignment and leveling with the west side posts and also the original hut.
f. When the raised roof frame and posts are properly aligned, back fill the four holes on the ground.
g. Attach the raised roof frame to the four posts using GI wire. Note: to do this, nail down a 4” nail halfway on the upper part of the post. Around this nail and the beam, loop the double GI wire repeatedly until the roof frame is tightly secured. Repeat for all four posts.
 |
| Bamboo beam attached to the main hut post using GI wire. Note the 4" nail below the beam around which the wire is looped tightly. |
A typical “alulong” hut for the fish farm normally has thatched roofing or GI sheet roofing. It really depends on your choice. Each has its pluses and minuses. GI sheet roofing costs more but lasts longer. A thatched roof allows warm air to rise to the roof and out thereby giving a natural cooling effect even during the hot summer season.
a. Buy the following materials:
· GI wire, 2 kilos
· Nail – 2 in., 1 kilo
· Nail – 3 in., ½ kilo
· GI sheet – 6 pcs., 6 ft. long each
· Plain GI sheet, one piece (for the ridge cap and also for rain gutter between the eaves of the two huts)
b. To attach the GI sheet roofing to the bamboo roof battens, roof wire straps were used. To save cost, local craftsmen or artisans merely improvise these wire straps as follows:
· Cut one inch square rubber from old rubber slippers or bicycle tires
· Punch a hole in the middle of the rubber squares
· Cut a ten inch length of GI wire; bend at the middle
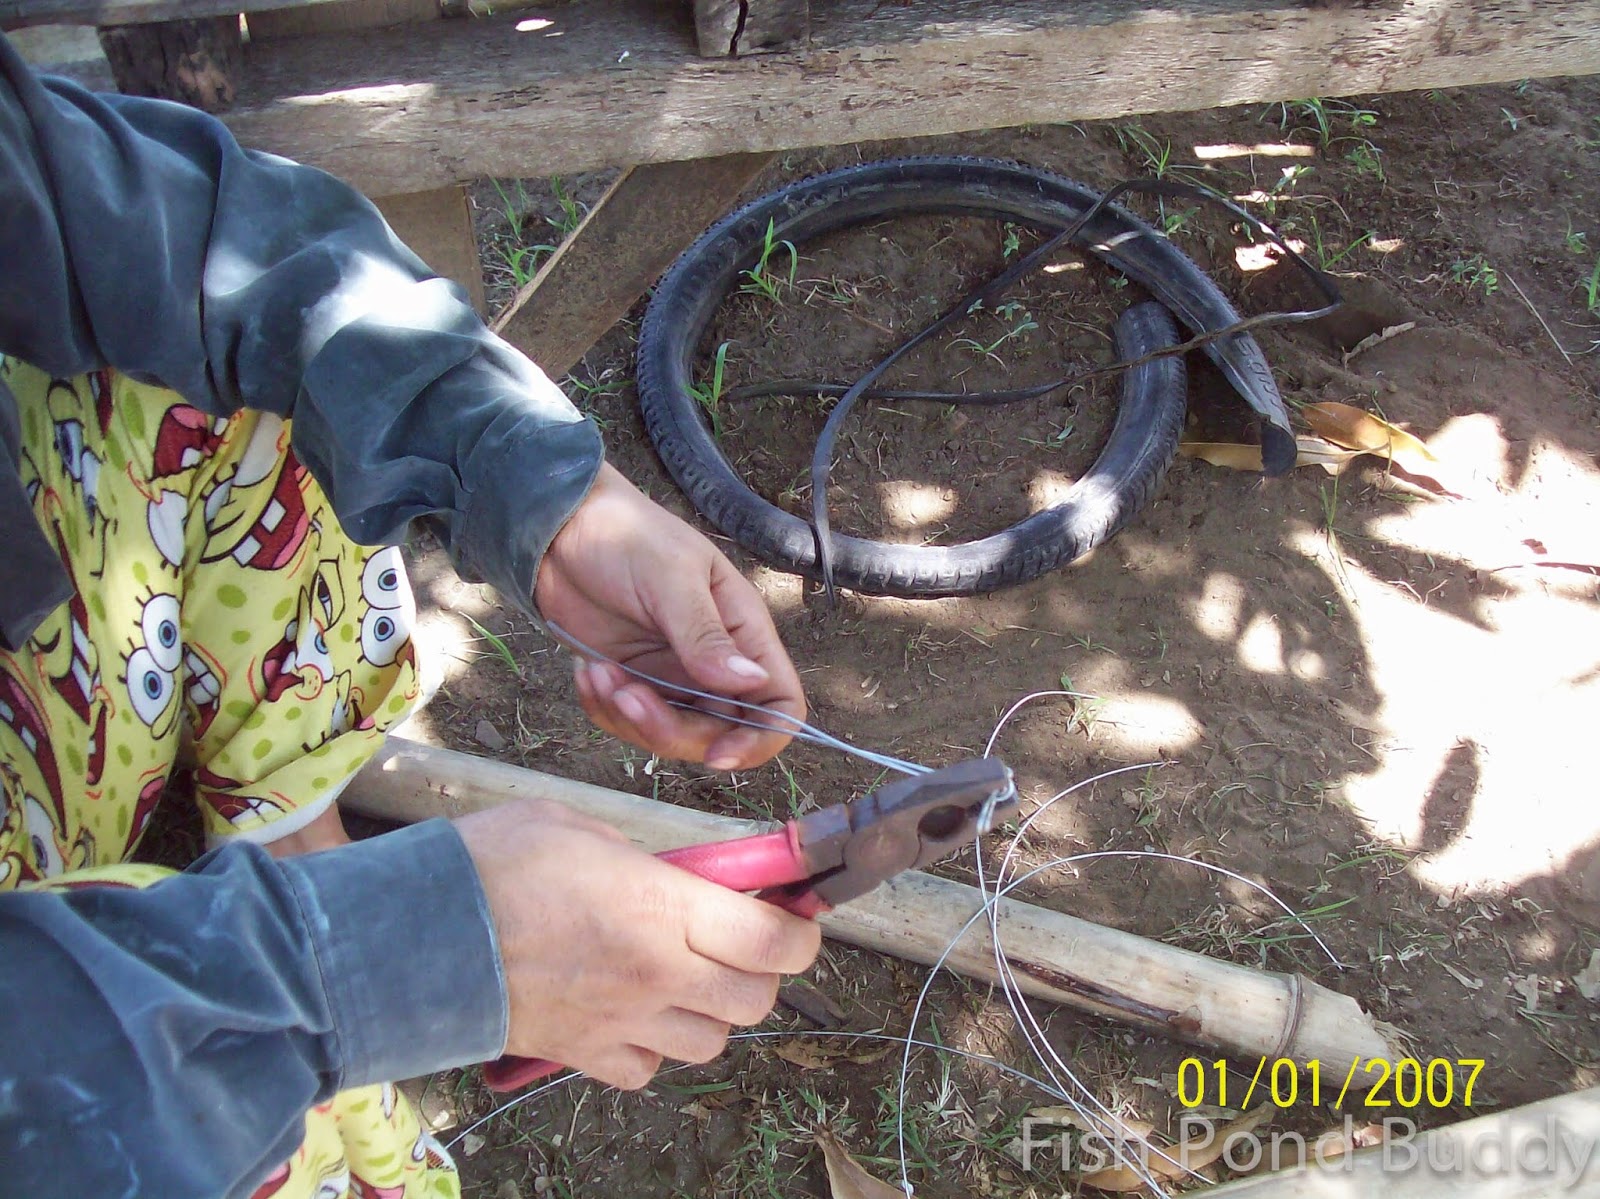 |
| Making a two-legged wire strap with a T-head |
· Insert the wire strap into the hole of the rubber square and pull until rubber square is lodged at the T end of the wire strap.
 | |||||
| Inserting wire strap into the square rubber end |
 |
| Completed wire straps for attaching roof sheets to the bamboo frame |
c. Lay the GI sheets over the roof frame, beginning at the ridge. Punch a hole (using nail) from above the sheet on the bamboo batten underneath. Insert one roof wire strap for each hole (each wire strap has two legs and one T-head). Make sure the batten is enclosed between the two legs of the strap. Pull hard until the rubber below the T-head is compressed against the sheet. Twist and tighten the wire legs together around the bamboo batten using pliers.
d. In my hut extension, I used 6 pieces of 6-foot sheet for the roofing, all attached to the bamboo frame using improvised roof wire straps.
e. For the ridge cap, cover the ridge using a plain (not corrugated) V-shaped GI sheet. Strap the ridge cap down also using rubber-covered wire straps.
f. For rain gutter, we installed only one horizontal piece, also using a plain U-shaped GI sheet. Where? Right at the middle of the two huts, below the eave of the old hut and that of the extension hut. Runoff of rain water from the roofs can then be diverted to the eave gutter toward the north side outside the hut.
 |
| Gutter (top) between the eaves of the original and the new extension hut; middle of photo shows the overhang roof frame made of bamboo and wood; see also the recycled GI sheets for the overhang roof |
f. For the overhang roofing itself, we used recycled GI sheets (see above photo) bought from a junk shop near the town proper. This is to lessen cost of materials.
g. As for the triangular shaped gable area at the side of the roof and above the overhang roofing, we also covered this with recycled GI sheets. We strapped the overhang roofing and gable area GI sheets to the supporting bamboo frames using rubber-covered nails or wire straps.
 |
| Triangular shaped gable area |
a. Kitchen counter – this is made entirely of bamboo located at the east most part of the hut extension. The kitchen counter top is below waist high with four bamboo posts, two lateral beams, and joists. Counter top is made of bamboo slats nailed over the joists. An improvised “backsplash” also made of bamboo slats was also added at the back of the counter top.
This counter area can be used for outdoor cooking or grilling, or for keeping cooked meals, utensils, water jugs, ice buckets, drinks, etc. – before serving meals to guests at the farm shed.
 |
| Bamboo kitchen counter for the extension hut |
 | |||
| Building the bamboo frame for the benches |
 |
| Sawing several pieces of "calasan" bamboo for backrest posts |
 |
| Finished U-shaped bamboo benches with backrest; dining table at the middle; kitchen counter at the rear |
Below is the completed hut extension, with its benches and small counter top - using bamboo and recycled materials and traditional knowhow. Not exactly pretty, but comfy, low-cost and functional enough for fish farm use.
 |
| Completed extension hut with benches, table, and countertop (right end) |
For a complete list of Fish Pond Buddy blog posts on fish farm-related topics, please click the Index page.