Pages

Monday, March 2, 2015

How to Harvest Using Pond Draining ("Limas")


How to Harvest Using Pond Draining (“Limas”)

Last month, we harvested our remaining fish stock toward the last part of the cropping season. In addition to the usual “kalokor” (harvest method using net), we did a complete draining (“limas” in Pangasinense) of one of my smaller ponds. That is, we totally removed the water from the pond. The pond contains some bangus, tilapia, and a few tiger prawns at the time.

It was in the middle of the dry season and water level has been receding to dangerously low levels. Pond draining was a preemptive move designed to save the prawns which are vulnerable to severe “tangok” (fish kill or stress due to low dissolved oxygen in the pond) in this kind of weather and season.

We also wanted to rid the pond of competitor fish like tilapia and burrowing predators such as mudfish (“dalag” in Tagalog, "gele-gele" in Pangasinense) before the start of the next cropping year. Pond draining allows the fish farmer to prepare the pond bottom, dikes, and gates for the next crop. For step-by-step procedures on pond preparation, click this (and go to the section on "How to Prepare the Bangus Pond After Acquiring It").


In a closed system, pond draining is done once a year usually when water levels are at their lowest.

Equipment and Devices Needed

1. Set of water pumps – each set consisting of the water pump motor and stainless steel hose. Depending on the pond size, one or two sets are usually needed.

Water pump and stainless steel hose

2. Tool set and supplies for operating the pump - usually consisting of diesoline container, diesel oil container, closed wrenches, pull string, grease gun, grease, diesoline.


Tools inside woven basket; worker filling grease gun container with grease; bottom end of stainless steel hose shown

3. Tricycle (motorcycle with side car) for transporting the above.

Not many fish farmers have their own drainage pumps. Instead, Item 1 is usually rented from a water pump owner. Current rate is Php700 for 12 hours which includes the services of two operators. The pump owner takes care of items 1,2 and 3, while the one renting provides the fuel (diesoline).

4. Haul seine net ("kalokor" net) – rented from seine net suppliers for Php200, 300, 400 for 12 hours depending on size

5. Bamboo screens or slats (“sikop”) – leased or owned

6. Scoop nets (“tapigo”)

7. Sorting net (“saplar”)

In our case, we have our own two diesel motor pumps, one 16 HP and another 14 HP bought in Dagupan. The hoses (one 8” and the other 7” diameter) made of 1.2 mm stainless steel plate were supplied by a stainless steel hose fabricator in Binmaley, Pangasinan.


Two stainless steel hoses
A pond measuring around 6,000 sq.m, usually needs two pumps running for about 12 hours. Thus, to do “limas”, set aside Php1,400 for pump rental and also buy diesoline around (Php1000) to run the pumps. For a smaller pond, you will need one pump for half the rental price and much less fuel.

Procedures

1. Remove all the bangus using haul seine net (“kalokor”). For step-by-step procedures for kalokor, click this (and go to the section on "How to Harvest Bangus"). Transfer smaller bangus to other ponds to further grow them. Sell the bigger ones, including tilapia that are caught by the net.

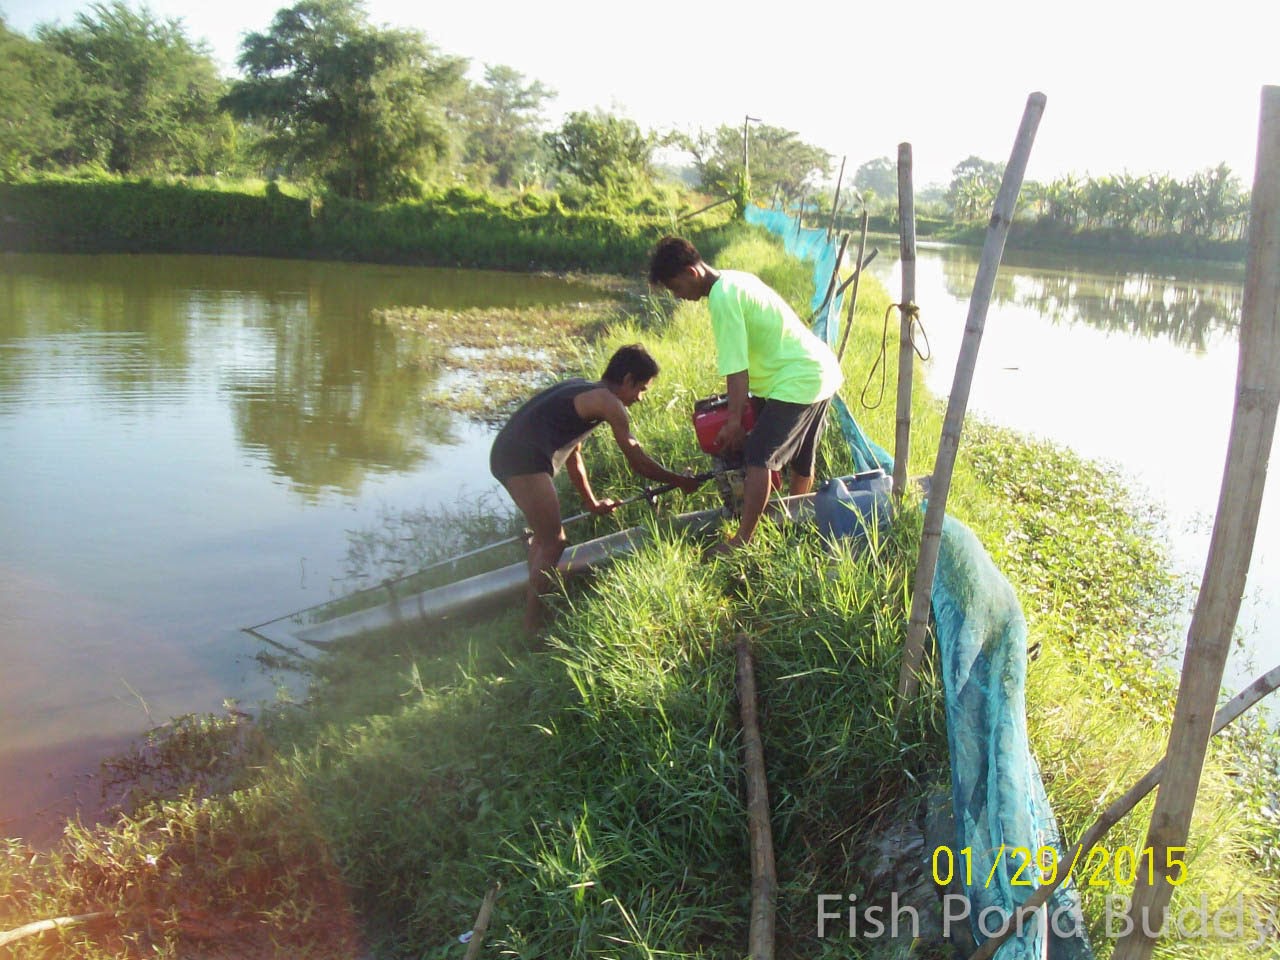
2. Decide on the specific position of the pump(s) in the pond. Pumps are normally set up on the earth dike near the deepest portion of the pond being drained. Also, set it up on the dike next to the pond where water is to be transferred. If water is to be drained to a neighbor’s pond, make sure that proper arrangement has been made with the pond owner.

Pump discharging water into an adjacent pond
3. Carry the water pump(s) and stainless steel hose(s) to the pumping site and attach the water pump motor on the metal platform above the hose.
Workers installing a water pump atop a stainless steel hose; at right is the adjacent pond where water is to be transferred

Workers installing a second set of water pump and hose

4. Set up a perimeter net around the stainless steel hose in the pond where water is to be pumped out. The bottom part of the stainless steel hose is placed at the deepest part of the pond which is surrounded by the net. Check the net to make sure that it is well anchored to the pond bottom (we use short bamboo hooked sticks (“tulaing”) for this purpose).
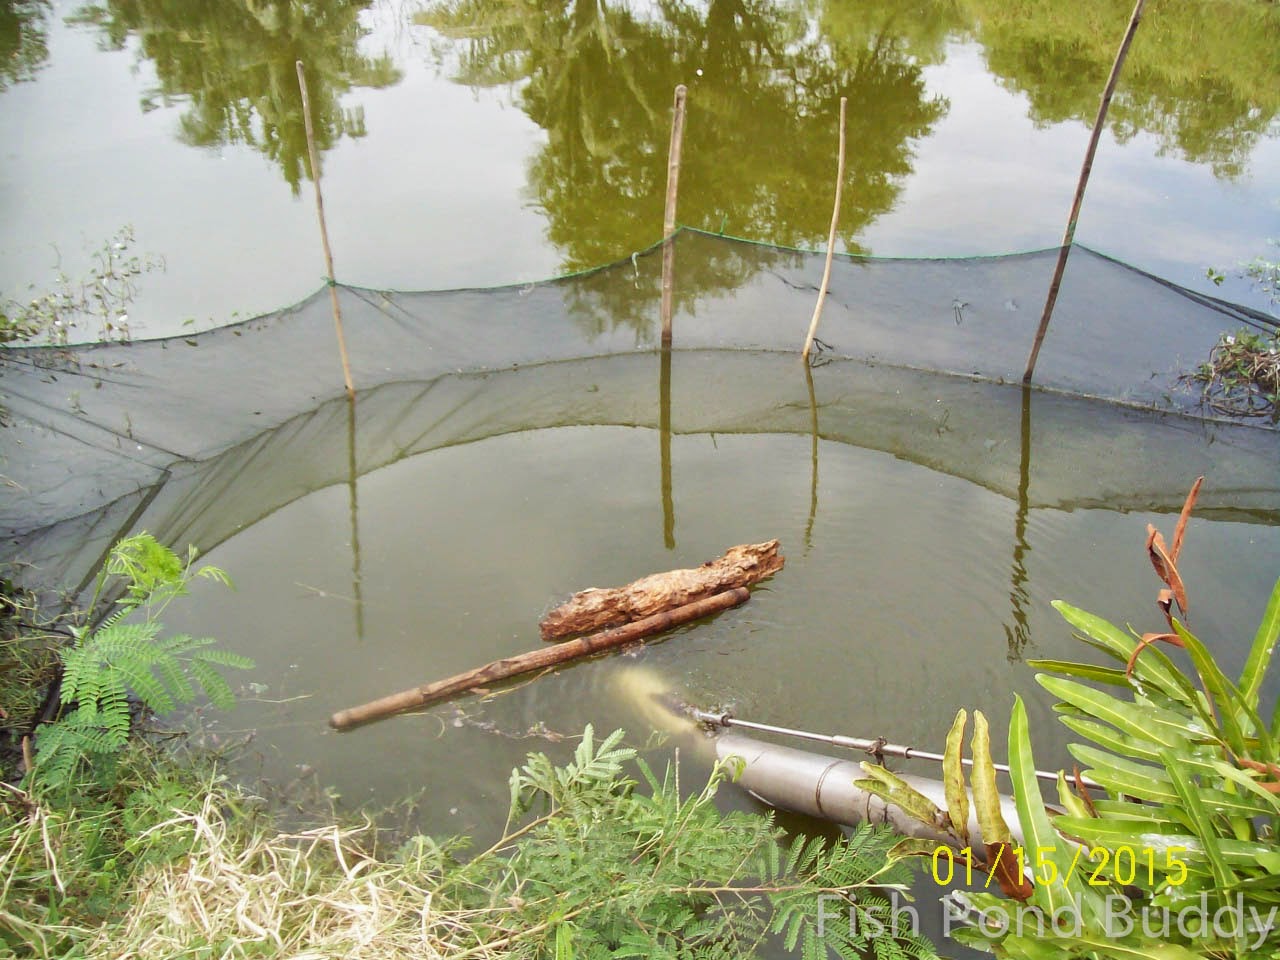
A net enclosure around the pumping area (usually the deepest part) where the hose is submerged

5. Before operating the pump, make sure that the stainless steel hose is steady and properly anchored at the pond bottom. Do a test run of the pump and check if the rotating rod above the hose and hose propeller are turning smoothly.

6. Instruct the crew to start pumping out water early evening (assuming it takes about 12 hours to completely remove the pond water), say around 6 or 7 pm. It is best to do harvesting in the early morning when fish and prawns are visible and can be easily hand picked.

7. Monitor the running of the pump(s). Be careful not to let in loose plastic bags or jute sacks into the stainless steel tube while the pump is running. This will cause damage inside the moving parts (propeller) of the hose and even cause misalignment of rotating rod.

8. Make small canals leading to the deepest portion of the pond to make sure that all the water throughout the pond flow naturally to this designated catchment area.


Making canal toward the catchment area just outside the perimeter net

Workers making canal to divert pond water to catchment area
 9. Install a bamboo screens or bamboo slats (“sikop”) across the canal leading to the catchment area. Fish are also trapped by the bamboo screens/slats and serve as a secondary catchment area.
Bamboo screen ("sikop") set up across the canal leading to the catchment area
10. When the water level is low enough, start removing remaining fish and prawns using scoop nets (“tapigo”). These fish (mostly tilapia and predators like mudfish (“dalag”) and prawns normally go to the deepest part of the pond as water is pumped out. The pumping in of water creates a natural water current that draws in fish and especially prawns (whose tendency is to swim in the direction of the water flow). 

Workers starting to hand pick fish/prawns
Putting catch inside scoop net ("tapigo")
Note that it’s not possible to do “pasuba” (water current method for catching fish) for bangus in a closed system pond like ours, in the absence of tidal waters.

In a Class A pond, it’s possible to let in new tidal water in the next incoming high tide. The bangus then swim against the current created by the incoming tidal water. Thus the bangus gets drawn into the catchment basin where they can be easily caught. In the case of “limas” in a Class C pond like ours, the tilapia and bangus do swim to the deepest part because they have no choice.

11. Remove the bigger sized tilapia and all mudfish (“dalag”) regardless of size. We normally sell smaller sized tilapia (size of teaspoon or matchbox) as fingerlings. Meanwhile transfer all tilapia from the scoop net to a sorting net (“saplar”) for sorting and counting later. Put all mudfish (“dalag”) in a separate scoop net.

12. During the latter part of the limas, set up a small catch net (supported by bamboo sticks) along the improvised canal leading to the deepest part of the pond. This is to aid in catching remaining tilapia, especially the fingerlings.


A small catch net across the canal

13. Using two workers, remove the bamboo screen/slats (“sikop”) from its original position and drag it along the bottom toward the catch net. This will drive the remaining tilapia toward the catch net where they can easily be hauled in.

Dragging bamboo screen toward catch net
14. Instruct all workers to make a final round of the drained out pond for any remaining grow-out bangus, tilapia or dalag as well as prawns.

Worker showing two big-sized prawns during clean-up phase

Close-up of two tiger prawns picked up from pond

15. Assign persons to monitor the movements of neighbors, onlookers and fish scavengers.

During “limas”, it is normal practice for neighbors (usually women and children) in the community to come over and watch the “kemel operation (hand picking of fish by pond workers). They wait for the “kemel” to be completed and for the stranded fish on the ground to be picked up by workers. 


Later, with the permission of the caretaker/pond owner, they all go down to the pond and scavenge for remnant fish ("kambog" in Pangasinense). Outsiders however are strictly told to keep off the pond and not scrounge for fish while regular workers are still at work in the pond and “kemel” is still ongoing.

Kemel fish catcher still at work combing through the almost drained out pond

16. Sort out the fish in the sorting net. All the prawns are placed in a separate scoop net. So are all the mudfish (“dalag”). Bangus which are of market size are taken out to be sold. Fingerling-size tilapia are counted and hauled in live for delivery to the tilapia buyer (these are placed in plastic vats with water). Mudfish (“dalag”) are also kept in plastic drums with water and brought live to the Dagupan fish center. (Note: live tilapia and dalag command higher prices.)

Below is a video coverage of a pond draining and tilapia harvest done in one of our grow-out ponds. It's a 6-part video which we uploaded in YouTube. The clip below is just the first part. Hope you view, like, and share the other 5 parts. Thanks for watching guys!


For a complete list of Fish Pond Buddy blog posts on fish farm-related topics, please click the Index page.

Sunday, February 1, 2015

Tasty Vegetable Dish in Bangus Fish Farm


Tasty Vegetable Dish in Bangus Fish Farm

One thing we like staying in the fish farm is the food. The milkfish ("bangus"), tilapia, mudfish ("dalag"), or prawns that can be caught from the ponds are rich sources of protein. Depending on season, fruits, leafy vegetables, edible flowers, and root crops can be picked inside the farm. All of them  fresh, natural, and cheap.

While we plant and grow a number of our fruit trees, vegetables, and root crops, others simply grow naturally around the pond. 


"Papait" plants growing along side of fish pond dike
"Papait" plant - newly dug up, with its root soil intact 

A good example is the edible pond weed (called “papait” in Pangasinense and Ilokano, “sarsalida” in Tagalog, “bitter leaf” or “slender carpetweed” in English) that can be found growing naturally in our farm. Among locals, it’s considered a common weed, but technically it’s an annual herb. 

Another close up view of "papait" plant - this time in a plastic pot
We notice that “papait” plants grow abundantly at the sides of the earth dikes of our ponds during the months of January, February, and March. When this time of the year comes, I ask my farm house cook to go out and pick some leaves and cook “papait” dish for me. It’s one of the favorite vegetable dishes that I enjoy in the farm. 

My cook picking young shoots
Here’s how we prepare and cook the delicious “papait” dish.

1. Check out the dikes for patches of “papait” plants that can be picked.

Patches of "papait" plants ready for picking
2. Pick or harvest the young “papait” shoots, 2 to 3 inches long, and put them in a plastic bag. 

Picking some young shoots/leaves for cooking
3. After picking enough shoots/leaves good for one cooking, transfer them in a small basin. Fill up with tap water and soak the leaves for a while.

Picked "papait" leaves in a woven tray ("bilao")
Fresh leaves in basin being filled with water

4. Clean thoroughly in water, remove any debris from leaves. Make sure no trace of sand or residual dirt remains.

Cleaning and soaking the leaves
5. After soaking and cleaning, transfer the “papait” shoots/leaves in another small basin. 

"Papait" leaves ready for cooking (left); "papait" plant in plastic pot shown for comparison (right)
6. Prepare sautéing ingredients: onions, tomatoes, garlic, shrimp paste (“bagoong alamang”), cooking oil. 

Ingredients: from top, "papait" leaves, shrimp paste ("bagoong alamang"), onions, tomatoes
7. Saute onions and garlic in cooking oil (we do cooking in the farm using the traditional clay stove "kalan", using only firewood). 

Onions and garlic being sauted
8. When onions and garlic start turning brown, add the shrimp paste (“bagoong alamang”). 

Shrimp paste ("bagoong alamang") added
9. Add the diced tomatoes and mash them thoroughly until soft. 

Diced tomatoes added

Tomatoes being mashed until soft 
 10. Add the "papait" leaves. Remember not to add water. 

"Papait" leaves being added

11. Mix and cook for a few minutes, then transfer in a serving bowl. 

Cooked "papait" dish
Sauted “papait” is best eaten fresh from the clay stove, with newly steamed rice.  Usually served with fried bangus or tilapia. Try it. Happy eating! 

Freshly cooked "papait" dish with newly steamed rice

For a complete list of Fish Pond Buddy blog posts
on fish farm-related topics, please click the Index page.


Monday, January 5, 2015

How to Clean and Make Sun-dried Tilapia


How to Clean and Make Sun-dried (“Dinaing” or “Pinindar”) Tilapia

Although our fish farm is used
predominantly to raise bangus and white prawns (p. vannamei), we do devote a small part of the farm to growing organic tilapia.


Newly caught tilapia

All male tilapia which grow bigger

 In my early years of fish farming (2006-2007), we bought a batch of molobicus tilapia fingerlings (5,000 pieces) from a supplier in Nueva Ecija at the Central Luzon State University. It’s a hybrid tilapia (cross between O. mossambicus and O. niloticus) that thrives or adapts well in brackishwater ponds (that is, it is saline tolerant). The molobicus when grown in brackishwater is said to taste better, grows faster and bigger, with higher quality flesh.

At that time, we also bought a new batch of niloticus. We were told that customers then were still unfamiliar with molobicus. With dark skin they may be mistaken for wild tilapia and shunned by customers. Being new to fish farming, we went ahead and  bought 5,000 pieces of niloticus (which have lighter colored skin). Over the years, they crossbred and we got the tilapia we have now.
 

From experience we also notice that brackishwater fish farms in our vicinity can’t help but have wild tilapia straying into the bangus ponds. These are often carried by floodwaters from overflowing adjacent freshwater ponds. The body of wild tilapia is colored black (for male) and greyish (for female). Both have reddish color at the tail (caudal fin) and the edge of its back (dorsal) fin. It's notoriously slow-growing but its taste is quite good.

The wild ones also crossbred with our molobicus and Niloticus and we got a  mishmash of tilapia species swimming in our ponds. Needless to say, quality has gone down a bit (in terms of growth rate) due to possible uncontrolled inbreeding, although taste has remained good.

Now we're planning to get a new batch of molobicus tilapia, for better breeding and productivity. We can do this after the end of the current cropping cycle when we totally drain our ponds and take out all the fish including tilapia (for an idea on how to do drain harvesting, click this).  


We’ll sell the market-sized tilapia, transfer the molubicus hybrids (juveniles and fries) and remove the wild ones. The new batch can then improve the breed of the existing hybrids.

We consider tilapia the fish for all seasons. It costs less compared to other fish, tastes really good, can be bought anywhere and anytime, and lends itself to easy cooking of various local tilapia dishes.

In addition, we feed our tilapia mostly with natural feeds (such as "tariktik" or rooted submerged aquatic plants, "lumut" or filamentous grass-green algae, "ipil-ipil" leaves, kangkong leaves), "trigo" (wheat) feeds, rice bran feeds, and some commercial feeds especially a few weeks before harvest.

In this blog post, we’ll show how to clean tilapia. My farm workers were planning to sun dry (“pindar” in Pangasinense) tilapia which they caught together with the bangus, so we’ll show how it’s done from Step 1.

1. Wash the entire tilapia batch to be cleaned to remove grime, other dirt materials on the surface of the fish. 


Newly washed tilapia ready for cleaning/cutting
2. Using scissors, cut off the following for each fish: tail (or caudal) fin, back (dorsal) fin.

Cutting off of back fin

 3. Cut off the pelvic and anal fins (tummy portion) and pectoral fins (at sides).

Cutting off of fins at tummy and sides

4. Cut off a portion of mouth (about a quarter of an inch from the end of the mouth). 


Cutting off part of mouth

Note that the above fins are often removed when tilapia is being cleaned for home consumption. But for other occasions, when presentation is important in the tilapia dish, there is no need to cut off the fins.
 

5. Scrape off the fish scales (“kaliskis) from the body using a sharp knife. Direction of scraping is from tail to head.

Scraping off scales

6. Slice the body of the fish into two at the spine (back or dorsal portion).

Slicing the body from the back or spine portion
7. Once the fish is sliced into two, pry open until butterfly shaped. Remove the guts (stomach and intestines). Remove also the gills (“hasang”).

Removing the guts and gills

8. Soak the gutted fish in a basin containing clean water.

Soaking in basin with water

9. Remove (push using fingernail) the blood attached to the spine or backbone. Note: if not removed, the fish will retain a fishy (“malansa”) odor and will spoil easily.

Removing blood in spine or backbone

10. Remove by hand the skin or tissue inside the upper part of the mouth to remove the source of slime-like oral mucus (so that the fish will not be full of mucus or spittle (“malaway”)).

Removing skin/tissue in mouth
Removing skin/tissue in the upper part of mouth


11. Wash the cleaned out tilapia thoroughly in water. Place in a small plastic basin.

Cleaned out tilapia in a small basin
12. Totally drain the tilapia to completely remove water before salting.

13. Sprinkle with salt. Note: depending on preference, additional spices can be applied like vinegar, pepper, garlic.

14. Spread the tilapia pieces on a large woven tray (“bilao”).


Tilapia in woven trays for sun drying
15. Place the tray (“bilao”) in a place where it can be exposed to direct sun, such as on the roof. In my farm, workers sun dry the tilapia for two days from 10 a.m to 3 p.m, when the sun exposure is as its maximum.  Also, hot sun rays are avoided by the pesky house flies, so no need to cover with nets.


Sun-dried ("pinindar") tilapia
 16. After drying, the sundried tilapia is ready to be fried and served especially for breakfast with fried eggs, and sliced tomatoes, onion, and salted duck egg with hot coffee. Happy eating!

For a complete list of Fish Pond Buddy blog posts on fish farm-related topics, please click the Index page.