I go to the farm not only to attend to business, but also to enjoy the respite from urban Manila. Trees and greenery, smog-free air, unclogged streets, fresh organic food, and the simplicity of rural folks, etc. are self-evident. They are like a balm to the harassed soul.
I notice that rural folks often rely on the old ways – the traditional, natural, low-cost. Clay stoves and firewood for cooking; bamboo and coconut-based stuff for farm work; coconut milk dishes and sun dried fish for lunch; bamboo stick and earthworm baits for fishing; coconut oil and herbal plants for healing; compost, saw dust, cow droppings for plant medium, etc. are normal practices. Bolo knife and sickle (for hewing wood and cutting grass) are commonplace.
For city creatures like me in this digital age, steeped in modern amenities, this culture and practices of the rural folks are fascinating.
Yet, I realize there are real needs even in the farm that can be best addressed by modern tools.
Does today’s technology have a place in the fish farm? Inexorably yes. Look at mobile phones (almost everyone has them, young or old, rich or poor).
The older folks may not be keen on technology, but their children are more savvy and routinely influenced by internet and social media. They are proficient in using today’s gadgets (including smart phones). Find these tech devices in the hands of even the farm youth. You'll be surprised. Access to social media and internet is also possible off-farm (i.e. in schools, in internet cafes in the town square), prepaid loads, and pocket wi-fis.
In this blog post, I’ll share my personal experience with another example of how modern technology benefits the farm - a surveillance system.
CCTV System for the Fish Farm
 |
| A newly installed metal pole with two CCTV cameras (we have a total of 7); see the video cable (Cat5) and below it a pair of 220 volts-power line below; after the concrete base hardens, the linesman' ladder and support bamboo poles will be removed. |
As background, we had some security-related problems in the farm sometime in April or May 2015. Poachers taking off with an entire batch of market sized bangus.
We discovered it when we did pond draining and final harvest. Only a few bangus were left. We also caught a drumful of mudfish. We presumed the mudfish predators were the culprit. But during pond draining, we all noticed signs of “tabal” (gillnet) marks around the neck on a number of bangus fish. That is, a large part of losses were due to theft.
We did some sleuthing and saw tell tale signs of intrusions in the northern part of our farm. Certainly predators – the human variety. We had suspects in mind and where they most likely come from, but alas, had no direct witnesses or strong evidence. The losses from the theft cut our profits to almost a third.
Moving forward, we can't afford to have loose security around the farm. We need to plug the loopholes and set up deterrents soon.
Thus, my decision to install a CCTV surveillance system for the fish farm.
Why is security important for fish farmers?
It's a basic need for a business just as for others. Fish farmers have to protect their vulnerable assets (near-market size bangus in grow-out ponds) from losses/theft. Not only from natural causes but especially from a few bad guys who view fish swimming in open ponds as fair game when no one is looking. (See related blog post on the Dirty Tricks To Avoid in Fish Farming, by clicking this).
Fish farms in our locality are almost always small/micro scale family enterprise. Most bangus farms are not fenced in. Earth dikes are linked from one pond to another. Dikes are traversed by both animals and local residents.
To save cost, the farmer adopts security measures which are mostly crude and don't require investment in expensive security assets. Includes:
1. Partial fencing – using bamboo posts and barbed wires or plain GI wires
2. Crude gates on certain earth dikes to block entry of animals (dogs, goats, cows); may deter entry of strangers
3. Use of perimeter nets in certain areas, both as protection against flooding or poaching from outside
4. Placing thorny camachile branches, or thin bamboo cuttings around ponds to prevent the use of gill nets (“tabal”) or cage traps (“nasa”) – two of the most frequently used catching devices by thieves and poachers.
5. House dogs – mostly street dogs or mongrels but hardly trained to be effective guard dogs 24/7, although their loud barks can deter.
6. Caretakers who also act as watchers
Well, back to our do-it-yourself CCTV project.
Downsides are : (a) it’s relatively expensive for farm owners (that is, it involves quite a sum), (b) not simple to implement, and (c) it will add to monthly electricity bill.
But take the bitter pill we must, if we want to have constant surveillance on the ground. On balance, given the benefits, we believe it's worth the cost. It keeps an eye on events 24/7, keeps video records good for three weeks. Videos can be replayed easily. Most important, footages are acceptable evidence when filing cases in our local “barangay” (village) and/or municipal courts of law, in case criminal complaints are filed.
Here’s how we did it.
CCTV Materials/Devices Needed
A. Cameras and Related Devices
1. Seven units high definition external infrared cameras - Php2,100 each
 |
| Two of seven high definition, outdoor, infrared CCTV cameras for our fish farm; mounted on metal brackets welded to the metal pole |
2. One eight channel digital video recorder (DVR) – Php4,000
3. One surveillance hard drive - 2 terrabytes – Php3,850
4. One 20” CCTV monitor Samsung – Php3,995
 |
| A newly purchased black monitor and DVR on the table; with their packaging boxes nearby |
5. One roll (305 meters) Cat5 cable – Php4,345 (I chose a wired system for better video reception)
6. Seven pairs of passive video baluns - @ Php180 each pair (one pair for each camera)
7. Seven pieces of outdoor power adapters @Php350 each
8. One external stand-alone infra-red illuminator (supplemental lighting at night) (gift from my sister)
B. Power Supply Lines for CCTV/Additional Pond Lighting
1. Three rolls (150 meters each) of #14 electrical wire @Php1,500 per roll
2. Porcelain strain insulators (also called “ball” insulators at the hardware stores) @ Php 20 each
3. Electrical tapes, plugs, sockets, nails, wire clips
C. CCTV Metal Poles and Steel Bars for Brackets
1. Three 20 ft. long, #2 (i.e. 2 inches diameter) metal poles @Php 900 each
 |
| Three metal poles, 20 feet long each with 2 inches diameter |
2. Anti-rust (red oxide primer) paint
3. Two flat bars - 1 inch wide
4. One angle bar - 1 inch wide
5. One rebar - 8 or 10 mm diameter
6. Metal saw blades
7. Welding rods (N-6013)
D. Cement work for installing metal poles
1. Portland cement @Php220 per bag
2. Sand @ Php20 per sack
3. Gravel @Pphp 35 per sack
4. Hauling pails @Php40 each
Step by Step Procedures
A. Planning and Purchasing
1. Plan the basic features of the system –
a. How many cameras, how many poles? For our 2.2 hectare farm, we need 7 cameras in three different locations within the farm to continuously keep an eye on all 6 ponds especially the most remote unobserved portions – north/northeast, east/southeast, west/northwest. Our farm house is located at the southwest corner.
b. Where to mount the cameras and install the metal poles? How far from the source of power? Where is the DVR and monitor located?
We needed to install three metal poles with brackets – Pole #1 with three cameras located around 110 meters from my house at the east, Pole #2 with two cameras around 50 meters from the house near west, and Pole #3 with two cameras located at the north around 90 meters away – total of seven cameras.
A 220-volt power supply is sourced from the farm house at the southwest corner.
The DVR and monitor will be located in our small farm office, so the video cables will run from there to the various poles and cameras.
 |
| A CCTV monitor and digital video recorder (DVR) |
The cameras must be the newer analog high-definition (AHD) type, all-weather, with infra-red lens for night viewing, must give crisp, clear images (i.e. with resolution of 720p or higher), with wide angle coverage, able to transmit HD videos up to 320 meters. I prefer the system to be wired to ensure clearer video images.
d. How high will the cameras be mounted?
In our system, 15 ft. from the ground is high enough to give an overall view of the location being monitored. We borrowed a lineman’s ladder to check if the view from that height is unhindered, if installation/repair work is possible at that height just using ladders, no need for climbing bars. Therefore a 20 ft. long metal pole will do the job.
2. Research on how a CCTV system works and its basic components. Setting up a CCTV system can be done in two ways – hire a CCTV contractor/skilled installer or install the system yourself. In either case, you need to understand the basics and be familiar with terminologies.
3. In our CCTV project, we opted to do it ourselves (me with my caretaker and aide, same two guys who helped me build a bamboo hut - for my post on bamboo hut construction, click this). For do-it-yourselfers, more detailed on-line research on the concepts and the how to’s are needed. I did the research at home in Manila where I have a desktop computer and broadband internet access.
4. Surf the internet for local CCTV suppliers (i.e., Manila-based). Most of them have their websites, product listings, prices, features, and contact numbers and addresses. You can compare products and prices conveniently at home. Make inquiries through phone or send emails.
5. When you’re ready with your chosen CCTV cameras and related devices and verified stock availability and prices, go and visit your preferred supplier.
We bought our CCTV gadgets in Metro Manila – not in Pangasinan where prices are much higher. For local readers who are familiar with these places, go to either Gilmore St. corner Aurora Blvd., Quezon City or Green Hills Shopping Center, San Juan City. My two suppliers are located in Gilmore (one supplier provided the monitor and surveillance hard drive, the other supplier supplied the rest).
6. Buy the items in your CCTV wish list. Make sure these are covered by warranties. Before paying for them and signing the invoice “received in good condition”, see to it that the cameras, video baluns, power adapters, DVR, and monitor are all tested and working.
We had an experience of returning a camera with defective power connector, a few video baluns that were outright defective, and a DVR that had a defective VGA cable socket (for connecting the VGA cable to the monitor) as a result of which the monitor showed no image. We thought it was the monitor that was defective, but it turned out it was one part of the DVR. All these can be avoided if thorough testing is done by the shop salesperson or in-house technician before you accept delivery.
B. Mounting Poles and Brackets
1. Prepare the metal brackets first on which to mount the cameras. Prepare one bracket per camera.
Note also that each camera will have an outdoor power adapter mounted beside it. So the metal bracket should be wide enough to fit both the camera and the adapter.
 Metal brackets for the camera and power adapter, for the power line, and for the Cat5 video cable (Note: you can see from the quality of welds that we're novice welders)
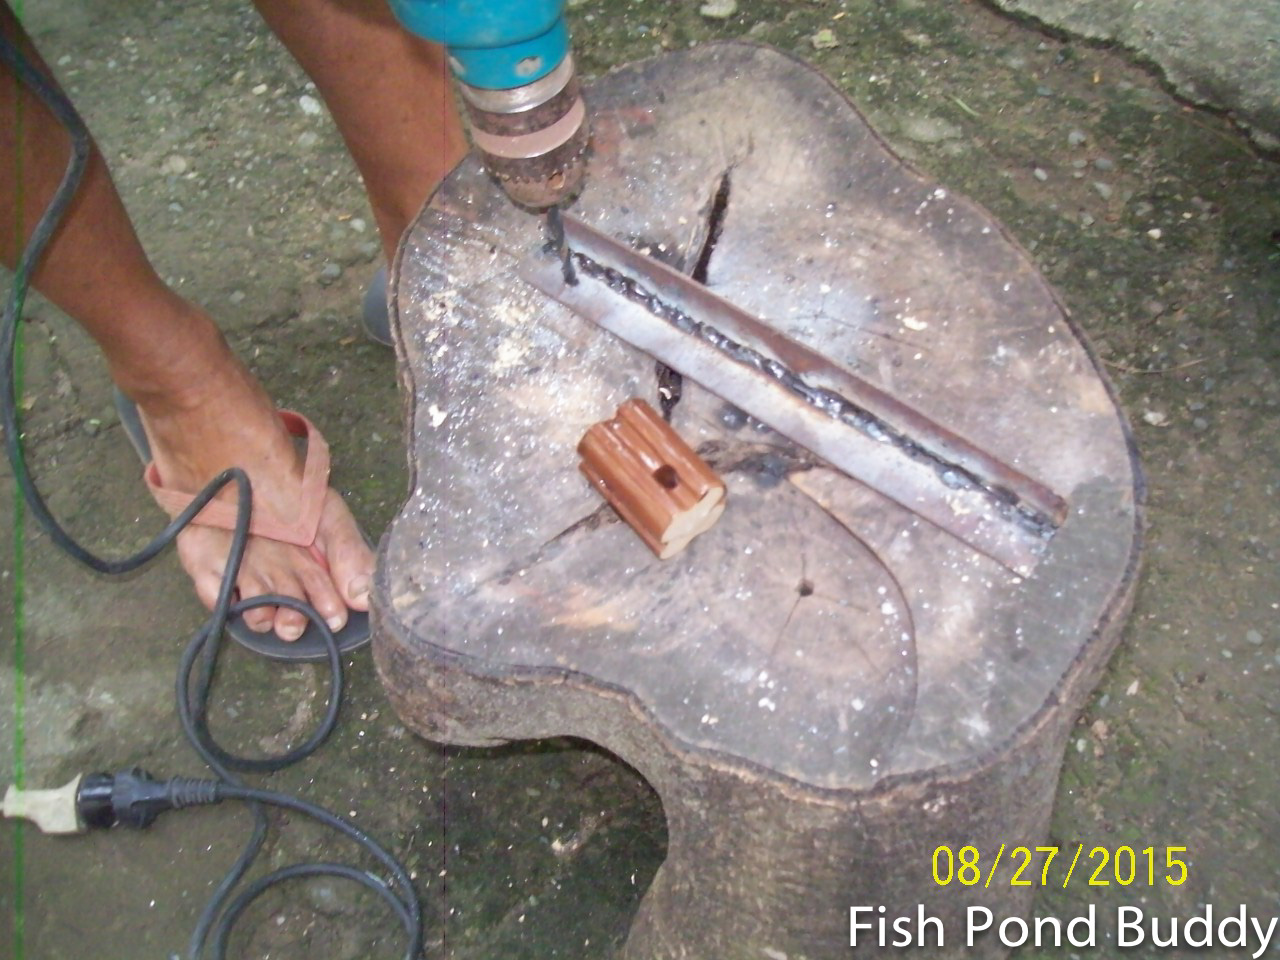
2. For each rectangular metal bracket, cut the required pieces from a 20-ft long, one inch wide flat bar (my design of the bracket has 2 long parts and 3 short inner parts). Weld the pieces together. Make your template for the camera/adapter bracket carefully to make sure it has enough room for mounting both the camera and adapter.
For cutting metal parts, we used a bench vise to grip the long flat bar and a metal hacksaw to cut off the pieces.
For welding, you’ll need the following:
· Welding machine – we used a portable DC inverter welding machine 200 amps, which is quite handy and can be plugged into ordinary household power outlets.
· Welding helmet
· Safety gloves
· Angle grinder
· Welding rods
· Chipping hammer
· Extension cord
 |
| Tools spread around in work area - hacksaw, extension cord, welding machine, welding helmet, safety gloves, bag containing rods and other supplies, chipping hammer, etc., electric drill, drill bits; 3 metal poles and welded brackets (foreground) |
3. Mark four holes on the welded bracket on which to mount the camera. Mark also the two holes on which to mount the power adapter. The power adapter should be mounted vertically with the DC connector area at the bottom portion (to protect against rain). Drill the holes using power drill using correct size of metal drill bit.
Note: Choose carefully the correct drill bit size that will fit the bolt/nut. Sometimes the screws that come with the camera/adapter package are good for mounting on concrete or wood. If a metal bracket is used instead, you need to replace the screws with the correct size of bolt/nut sets for the metal brackets.
After drilling, check if the bolts can be easily inserted into the holes in the brackets.
 |
| Aligning the camera base on the metal bracket to mark the holes |
 |
| Drilling the holes on metal bracket on which to mount the camera |
4. Repeat Steps B-1 to 3 to complete all seven mounting brackets for the seven cameras and power adapters.
5. Weld the brackets to the three metal poles. In our project, we used three poles – Pole #1 with 3 cameras, Pole #2 with 2 cameras, and Pole #3 with 2 cameras.
 |
| Metal poles for Poles #1, 2, 3; a metal bracket for camera being welded on one of the metal poles |
6. Install the first bracket high enough, say 2 feet from the top of the pole. A second bracket may be installed 4 inches lower than the first, a third bracket another 4 inches lower than the second.
Note: A metal pole is 20 feet of which 3 feet is buried, leaving a net height of 17 feet. Thus, the highest camera on the pole is 15 feet high which is good enough to give a high angle camera view.
7. Make sure that before welding them to the pole, the brackets are correctly oriented to the desired camera angle and general direction (that is, when mounted, the camera can give an overview of a location being monitored). Note: cameras can be rotated sideways left or right and tilted up or down, then tightened in place using Allen wrench.
 |
| Metal brackets for the 3 cameras welded to the metal pole; each one facing a different direction; notice the distance from each other |
8. Weld a piece of an 8 or 10 mm rebar from the back of the bracket to the pole (as back support)(see photo below) to hold the bracket and camera steady during strong winds or typhoons.
 |
| A support bar welded at the back of the bracket to the pole |
9. In addition to the metal brackets for the cameras and power adapters prepared in Steps B-1 to 4 above, prepare three other types of brackets for each pole:
· Metal bracket for connecting the power lines (220 volts in the Philippines) from the house source to pole (see photo below)
 |
| Drilling two holes on the metal bracket for the 220 volt power line; a porcelain ball insulator beside it (to be attached to each hole) |
· Metal bracket for the Cat5 video cable running from DVR to pole (similar to power line bracket but shorter)
· Metal bracket for installing the wooden base of the power outlet on the pole (to which the power adapters will be plugged in)
Note: We used a recycled plastic water jug to house an electrical outlet; the outlet is mounted on a wooden base (photo below) and enclosed by a jug.
 |
| Metal brackets (top, bottom) to hold the wooden base for the power outlet |
 |
| Drilling holes to attach wooden base to metal brackets |
Specs for these brackets are:
· Power line brackets – 10 inches long, cut from an angle bar, with two holes
· Cat5 video cable brackets – 6 inches long, cut from an angle bar, with two holes
· Metal brackets for wood base – 2 pieces needed (one upper, one lower), 10 inches long; upper is cut from a flat bar, lower is sawed off from an angle bar, both with two holes
· Cat5 video cable bracket – welded between first and second camera brackets
· Power line bracket – welded one foot from the lowest camera bracket
 |
| Metal bracket for 220 volts power line being welded to the metal pole (should have used a piece of angle bar, but we just welded 2 pieces of scrap flat bar instead) |
· Wood base metal bracket – upper bracket is welded 15 inches below power line bracket; lower bracket is 15” from upper bracket (photo below). Note: Wood base is 15” long to accommodate a gallon sized plastic water jug (improvised housing to enclose the power outlet and protect it against rain).
 |
| Welding the metal brackets for the wooden base of the electrical outlet |
10. Paint the metal pole and brackets with red oxide primer to protect against rust (see photo). Before painting, smoothen the rough welds using angle grinder.
 |
| Metal pole being painted with red oxide primer, including brackets |
11. Attach the wooden base to the metal brackets and fix it in place with wood screws.
12. Attach a 3-slot electrical outlet, preferably weather-proof, on the wood base.
13. Make sure that the electrical outlet is enclosed by a plastic water container (with cut-outs for retractable cover)(see photo below).
Note: we used the plastic jug to save cost instead of buying an expensive all weather power outlets with metal housing.
 |
| An improvised power outlet cover using a plastic water jug; see the 3-slot electrical outlet being mounted on the wood base |
C. Erecting the Metal Pole
1. Locate and mark the exact spot where the pole will be installed.
2. Dig a hole on the spot identified. The hole should be wide enough (2.5 feet) and deep enough (we dug 3 feet) for the pole footing (photo below).
 |
| Digging a hole for Pole #1; see the bottom part of the pole at right |
3. Insert the metal pole with all its brackets and base support into the dug hole. (Note: the base support is a pair of metal crossbars welded at the base and another pair 2 feet higher - see photo below). Use a pulling rope to make installation easier. You need 3 people to do this.
 |
| Two pairs of crossbars being welded to the pole as base support |
4. When the pole is in vertical position and correctly oriented to the plumb line, secure in place using temporary props (such as bamboo stakes).
 |
| Checking if metal pole is plumb (exactly vertical) before fixing in place and pouring concrete into hole |
 |
| Securing pole in place using bamboo stakes after inserting in hole and aligning to plumb line |
5. Prepare enough cement, sand, and gravel mix to be used as concrete to fill up the dug hole for the post. A high strength mix (Class A) concrete is a combination of one part Portland cement, 2 parts sand, and 4 parts gravel. (We used the ratio 1:3:4.5)
6. Pour the concrete into the hole until full.
7. Provide a concrete pedestal above ground at the base of the post for added support (photo below). We used an empty large biscuit can (with top and bottom cut out) as a sleeve around the pole. Pour concrete mix inside the can. When concrete has set and is firm, remove the sleeve.
 |
| Pole #1 with concrete pedestal at the base |
For Part 2 on How to Install a CCTV System for the Fish Farm, please click this.
For a complete list of Fish Pond Buddy blog posts on fish farm-related topics, please click the Index page.
I like reading your articles, it has given me knowledge and inspiration to restart and manage our fishpond in Binmaley, it has been unattended and not given attention for years since we are based in Metro Manila also I miss Pangasinan as my Province. Hope that we could meet there someday and maybe share tips and some supply resources to me since i'll be there often once I start the FishPond Business. thank you, God Bless.
ReplyDeleteHi! Thanks for your kind comments and for following Fish Pond Buddy. Glad to be of help. Will continue to share our experiences in the farm in my future blog posts. See you later in Binmaley. Regards!
DeleteWe are honestly, I was searching for the same information from the last few days. Keep posting and keep sharing the great How to Install a CCTV System service for all.
ReplyDeletecorporate alarm systems auckland
Hi Brian! Thanks for reading my posts in Fish Pond Buddy. To this day, we continue to reap the benefits from our farm surveillance system. Will keep posting and sharing our farm experiences for our readers. Have a nice day! Regards.
DeleteGreat post....Thank you for posting the great content……I found it quiet interesting, hopefully you will keep posting such blogs…
ReplyDeletecctv Security in Chennai
Wifi camera Chennai
Security alarm in Chennai
Fire saftey in Chennai
Security mobile alerts Chennai
Hi Sweatha! Thanks again. I also learned a lot from this do-it-yourself project. Glad to share it with all of you. Regards!
DeleteHello Sweatha! Thanks for your encouraging feedback. Have a nice day!
ReplyDeleteThanks for sharing nice information with us. i like your post and all you share with us is uptodate and quite informative, i would like to bookmark the page so i can come here again to read you, as you have done a wonderful job.
ReplyDeleteCCTV Security Dubai
Good evening Ramiz! Just opened my email a few minutes ago and saw your message. Glad you found the post useful and up-to-date. Thanks for the kind comment. Regards!
DeleteIt's really interesting.... I just need some information about idea.... Very inspiring... Thanks for sharing this article....
ReplyDeletecctv camera in Chennai
Hello! Thanks for reading my post on the farm CCTV surveillance. If you see the need for such a system, try it on your own as a DIY project. I believe it's replicable almost anywhere, with some modifications, as needed. Good luck! Regards.
DeleteSecurity must be needed in our every sphere of life and works.I appreciate CCTV for the security of our lives. cctv monitoring services in india
ReplyDeleteHello Harikumar! Thanks for reading my blog. Do appreciate your kind comments. Have a nice day!
ReplyDeleteYes, indeed, security is a must for our day to day lives. And CCTV surveillance technology is one of the measures available to us. I've seen first hand how effectively it has worked for me as a fish farmer. Regards!
ReplyDeleteHi! Fish Pond Buddy extends our warm greetings to our readers in Bangalore. Thanks for your kind comments. Regards!
ReplyDeleteHello to my readers at Top Spinning Reels! Thanks for liking my post on this topic. Yes, will continue to share my experiences as fish farmer at Fish Pond Buddy. Regards
ReplyDeletehome camera security is very important this article is useful very good
ReplyDeleteWhile you are away from either your home or business and motion is detected, you wiSydney Security Systems
ReplyDeletell receive an alert via email or text directly to your mobile device.
Hello Jade! You're absolutely correct.
DeleteUnfortunately, my system right now, although capable, is not yet set up for real time remote viewing (thru my smart phone) or for "push notifications" or email/text alerts. Maybe later. My current limitation - farm has no broadband service yet. Will I get one? Not my priority yet. I have trusted people at the farm 24/7. Farm is also prone to false alarms or motion detections (due to birds, animals, etc.) I stay there half of the time too. Am satisfied with my CCTV system mainly for its deterrence factor. But I can rewind footages too, if the need arises. So far system is working and no untoward incidents yet.
Thanks for your inputs. The alert and notification features of a surveillance system are indeed very useful if one is away from home or business. Regards.
Hi Joseph! Use of surveillance cameras is indeed very important in deterring crime and contributing to crime solution. Nowadays, business establishments in our Philippine cities are required to install CCTVs. No CCTVs, no business permits. Also our local governments install cameras along the streets to fight crime and improve peace and order.
ReplyDeleteMy personal experience is that after we installed CCTVs in our fish farm, the poachers got scared. I think they became camera-shy.
Thanks for reading my blog. Regards!